Mail Group
1. Mail Group
AAMail's mail group is very powerful and easy to use. You can put all the accounts into one mail group, or select which accounts belong to which group as you wish. All the members in the group will receive the mails which are sent to the group. Moreover, AAMail supports creating multiple mail groups.
2. Mail Group Features
AAMail supports setting the permission about sending and receiving mails of the group members, such as "Allowe Internet incoming mails" and "Allow all local incoming mails" etc.
We've made an elaborate design for AAMail's group mails. All the accounts in the group can see the mails which are sent to the group with only one copy of these mails, rather than multiple copies of mail entity to each group member. The processing efficiency of group mails is very high, and you have nothing to worry about even if you send an email with more than 20M to a mail group with 1000 accounts.
AAMail supports the group to be a member of another group. When an email is sent to a group, not only the accounts in this group can receive it, but also the group's subgroups and subgroups' all accounts will receive the mail. If an account belongs to multiple mail groups, then this account will only receive one mail instead of multiple mails.
3. Create Mail Group
1) In the AAMail main interface, on the toolbar, click the "Group" button (Figure 1-1).
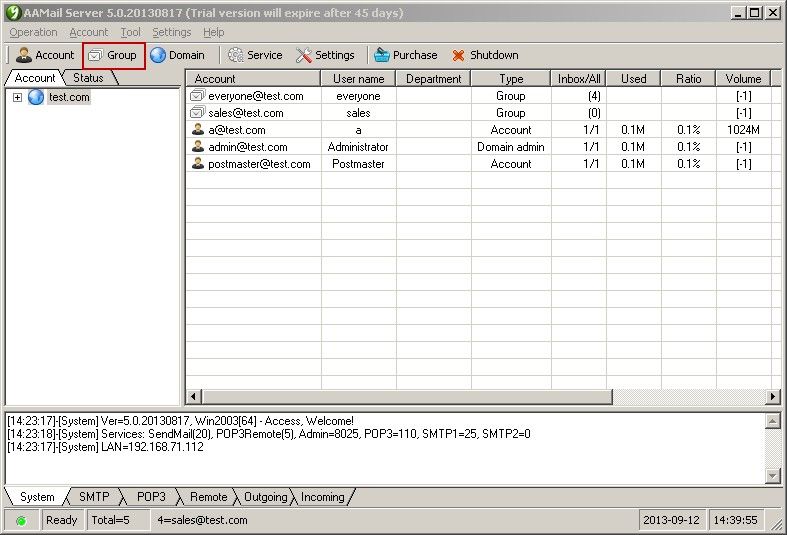
Figure 1--1
2) In the pop up "Group" dialog box, type the group account, password and group name into their corresponding edit boxes, and then click the "OK" button (Figure 1-2).
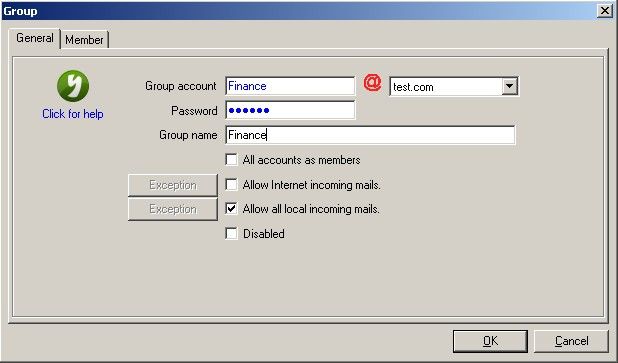
Figure 1-2
All accounts as members: Whether to enable all accounts as members of this group.
Allow Internet incoming mails: Whether to allow receiving Internet incoming mails. Next time you open this dialog box, you can click the "Exception" button to set a black list.
Allow all local incoming mails: Whether to allow the accounts of the domain to send mails to the group. Next time you open this dialog box, you can click the "Exception" button to set a black list.
Disabled: Select to disable this group; uncheck then this group will be available.
3) Double click the group you just created. In the pop up "Group" dialog box, click the "Member" tab. Then, you can add and delete members for this group. (Figure 1-3).
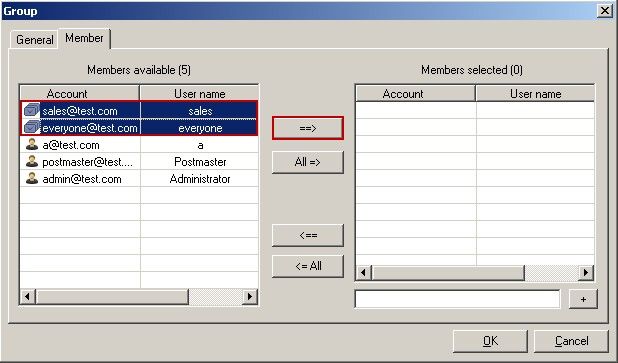
Figure 1-3
Members available: Select one or multiple accounts, and click the "==>" button, then this/these account(s) will go to the "Members selected" column, that is, to be the member(s) of this group. Click the "All =>" button, then all accounts will be the members of this group.
Members selected: Selected members of this group. You can click the "<==" button or "<= All" button to remove this/these account(s) from this group.
Button "+": Manually create accounts for this group.
Up to this point, the processes of creating mail group are finished.
Related: