Create Mail Account
1. Create Mail Account
After running AAMail program, on the toolbar, click the "Account" button, or on the menu bar, click "Account -> New account", and then it will pop up "Account creation wizard" dialog box. With only three simple steps, you can finish creating an account. If your domain name is the "Map Mail Server Mode", it has an additional "Map settings" setup step. Please see the specific steps below.
2. Step 1 Basic information
Type the Account, Password and User name into their corresponding edit boxes, and then click the "Next" button (Figure 1-1).
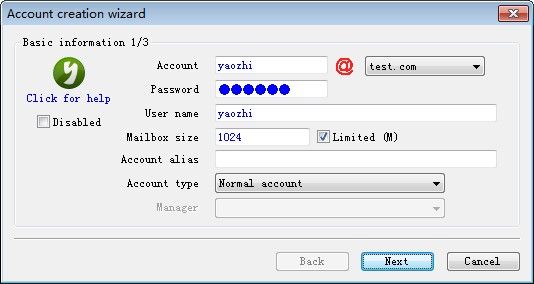
Figure 1-1
Account: Type an account as you wish. And you can click the "@" combo box to select a domain.
Password: Set the password of this account.
User name: Set the user name of this account.
Limited (M): Select this check box, and then you can set the "Mailbox size".
Mailbox size: Set the mailbox size of the account.
Account alias: The second name of the account.
Account type: Includes Normal account, Domain administrator, Server administrator, Special local staff account and Special manager account.
Manager: Select the check account.
Normal account: Normal user's account.
Domain administrator: Supports managing the local domain accounts on Webmail, including create and delete accounts etc.
Server administrator: Supports managing all the domain names and accounts on Webmail, including create and manage domain names etc.
Special local staff account: Only displayed on "Share mail server mode". The sending mails' accounts will be replaced by the manager account.
Special manager account: Only displayed on "Share mail server mode". It supports auto transferring the received mails to the internal employees.
3. Step 2 Map settings
If you chose the "Map mail server mode", it has an additional "Map settings" setup step. Other mail server modes don't have this step when creating account (Figure 1-2).
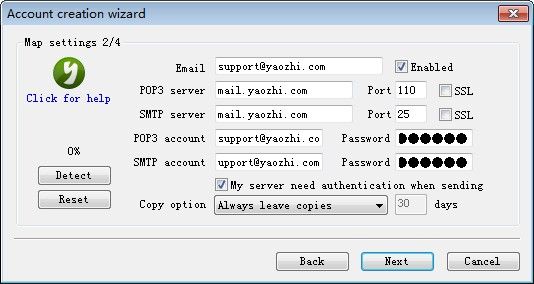
Figure 1-2
You can set an external mailbox for this account, and it will send mails via this external email address (rather than the created AAMail account).
After setting the external mailbox parameters, you can click the "Detect" button to see whether the parameters have been correctly set or not. If it is OK, you can click the "Next" button to continue the settings.
4. Step 3 Permission
In the "Permission" dialog box, you can restrict the incoming and outgoing mails of the account (Figure 1-3).
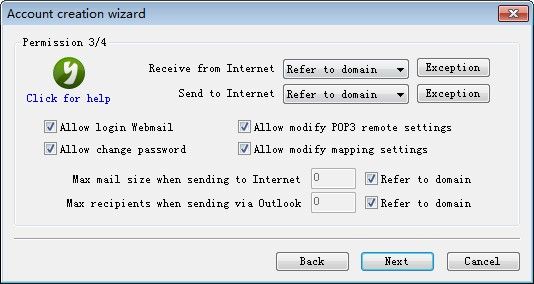
Figure 1-3
Receive from Internet: Restrict receiving mails from the Internet.
Send to Internet: Restrict sending mails to Internet.
Forbid: No matter how you set the domain parameter, this account will be forbidden to receive mails from Internet or send mails to Internet. And you can set the white list by clicking the "Exception" button.
Refer to domain: Using the parameter control of domain level to determine the account's permission of sending and receiving mails. If the domain parameter permits, then it will allow receiving and sending mails from and to Internet. Otherwise, it will forbid.
Allow: No matter how you set the domain parameter, this account will be allowed to receive mails from Internet or send mails to Internet. And you can set the black list by clicking the "Exception" button.
Forbid: No matter how you set the domain parameter, this account will be forbidden to receive mails from Internet or send mails to Internet. And you can set the white list by clicking the "Exception" button.
Allow login Webmail: Whether to allow login Webmail.
Allow modify POP3 remote settings: Whether to allow modify POP3 remote settings on Webmail.
Allow change password: Whether to allow change password on Webmail.
Allow modify mapping settings: Whether to allow modify mapping settings on Webmail.
Max mail size when sending to Internet: Allowed max mail size when using client software to send emails to Internet. You can select the "Refer to domain" check box, or uncheck it to set the value as you wish.
Max recipients when sending via Outlook: Allowed max recipients when sending emails via Outlook. You can select the "Refer to domain" check box, or uncheck it to set the value as you wish.
5. Step 4 Information
You can set company and personal information here (Figure 1-4).
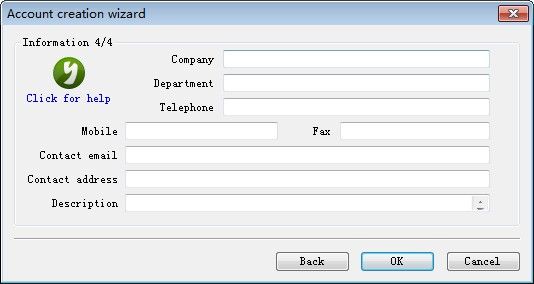
Figure 1-4
Compared with other information, the "Department" is more important, because it can be used to search the account. And it is not necessary to input all of the above information, because it is just for your reference.
Related: